Create your own board game with photos
The unique family board game that replaces a classic
After the gifts are unpacked and the feast has been eaten up on Christmas Day, you spend time together with your loved ones at home. This is often a time when the good ol’ playing cards and board games are taken out of the cabinet and played. You can make family time even better this year - with your very own board game!
A Different Spin on the Acrylic Glass Wall Decoration
With ifolor you not only have the possibility of printing out your photos on high-quality photo paper, but also the ability to eternalise your photos on a high-grade acrylic glass plate. Here, your photo is printed on the rear side of a 4-mm-thick acrylic glass plate using elaborate UV direct printing. Your photo is then optimally protected and receives a classy finish.
The wall mounts delivered with the wall decoration are optional. Without them, the picture will lie flat on its back. Then came along the idea: with its high-quality and solid surface, this product doesn’t only serve as a wall decoration, but also makes a great game board. Since you can print out your own design on the acrylic glass, the design possibilities are endless.
A Personalised Board Game for the entire family
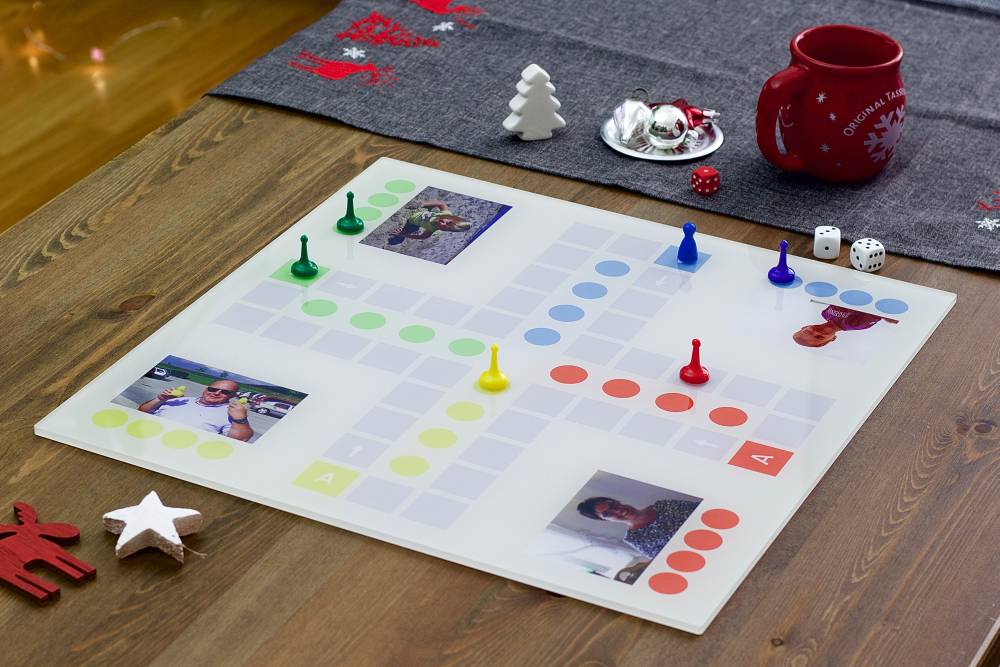
Our game board is based on the traditional German board game “Mensch ärgere Dich nicht!“, which is very similar to the board games “Sorry!” and “Ludo.” The cross design out of circles and player areas were taken from the old version of the game board and modernised. The highlight of creating your own acrylic glass game board is the ability to add a photo for each player. This will prevent any arguing about who gets what colour on the next family game night and you’ll end up with a really special Christmas gift for both yourself and your family.
You can order the acrylic glass plate in a multitude of sizes. Since our template is square, we went with a quadratic 40 x 40 cm format. ifolor also offers the sizes 30 x 30 cm, 60 x 60 cm, and 80 x 80 cm. The template is suitable for any of these sizes. When choosing photos of the players, keep in mind that a higher image quality is needed since they will be printed out in a larger size. Normal smartphone and camera photos with a file size of 1.3 - 2 MB are sufficient for any of these sizes.
You won’t be able to add the player photos to the board during the ordering process. These have to be added to the ready-made template on your computer before ordering the acrylic glass plate. This is possible to do with many graphics programs, such as Photoshop or GIMP. Afterwards, simply upload your own game board image file in JPG format while ordering.
The Players’ Own Photos on the Game Board
Adding your own family members as the players will take a bit of time, but is easy to do (even for laymen) if you follow our step-by-step instructions for using the free graphics program GIMP. Download the program from the developer’s website and install it on your computer. Pick out a picture for each of the four family members and save our template to your computer.
Step 1: Open our game board template with GIMP.
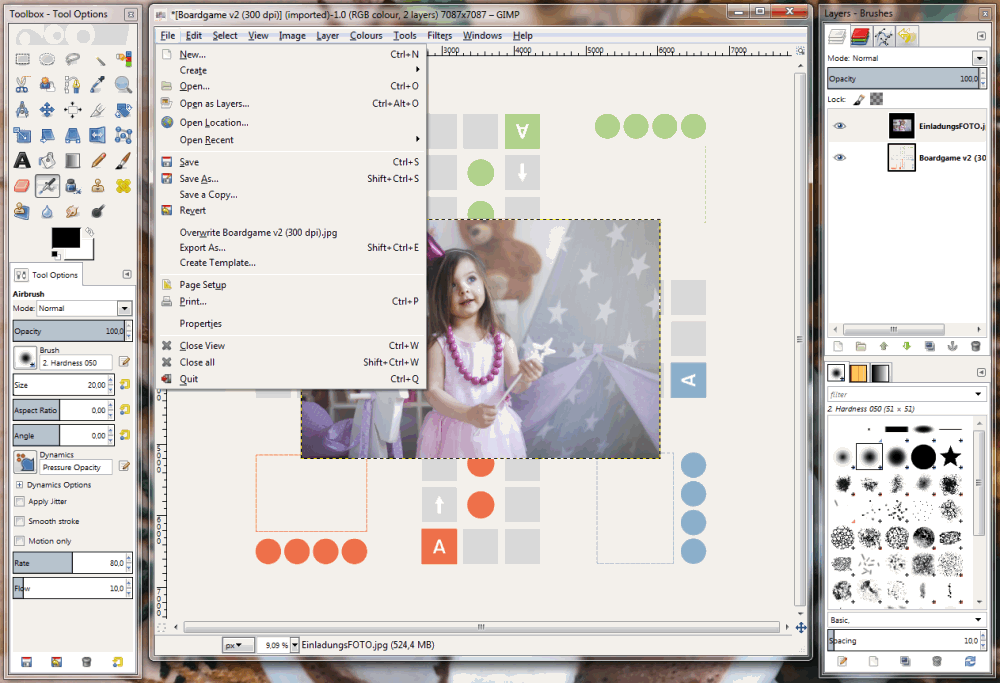
Step 2: Upload the first photo of one of the players in the menu under “File” and “Open as layers.” The image will then be opened in GIMP and will be visible as a new layer in the window on the right. It’d be easiest to start with the person who will be the red player.
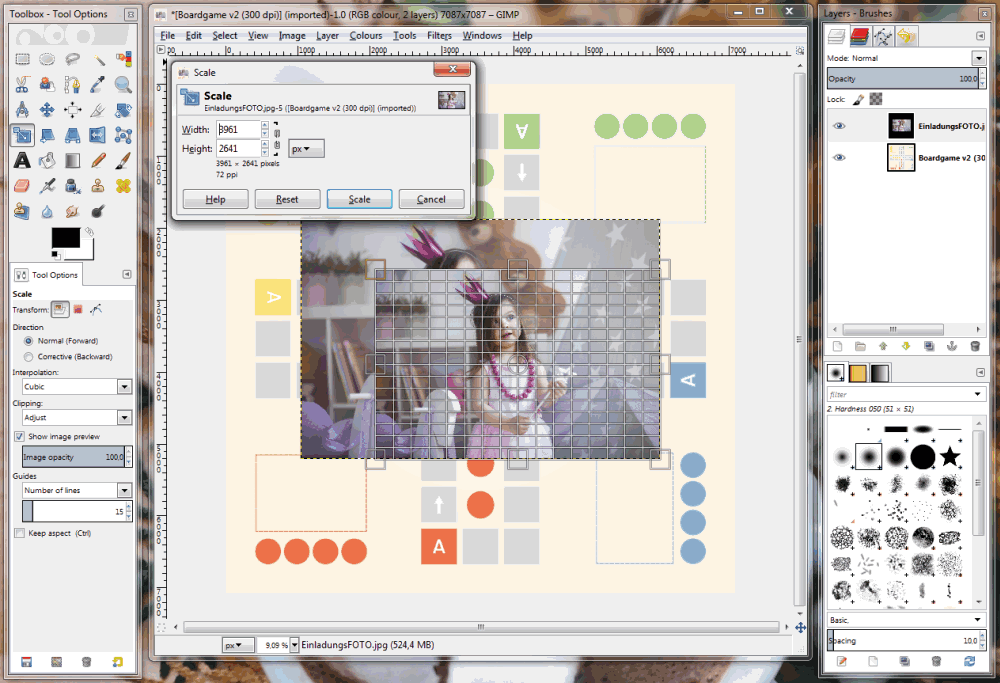
Step 3: If you slowly hover your mouse over the icons on the left side, you’ll be shown each of their functions. In the toolbox located on the left, select the “scale” tool. Then click somewhere on the game board and keep the mouse pressed down. Click the control key at the same time. Now keep the mouse clicked while holding the control key and move your cursor across the screen and you’ll see how the image is minimized or enlarged. When your photo is approximately the same size as the dotted player area, then you can release your mouse and the control key. The program will then scale your photo to the chosen size. It’s best to make the image a bit smaller than the dotted field to make the next steps easier.
Tip: You can undo any steps in the program by using the keyboard shortcut CTRL+Z or clicking on “Edit” in the menu.
Step 4: Then choose the “move” tool in the toolbox and move the player’s photo into the red dotted frame. Before moving the photo, make sure that the tool mode “move active layer” is selected in the toolbox window.
Step 5: Now repeat steps 3 and 4 until the photo fits in the dotted frame. In order to better see the frame, you can zoom in on it in between steps. To do this, simply hold down the control key and scroll with your mouse. Then just release the control key once you’ve zoomed in enough. Most of your photos will most likely be a bit wider than the template’s frame. You could either have your photo cover the frame or leave a bit of space in between the frame and the photo. Now you’re finished adding the first player.
Step 6: Repeat steps 2 through 4 with a photo for the blue player. Then, before or after step 5 select the “rotate” tool and click on your photo. A small window will be opened. In the middle you’ll see a slide control. This goes from -180° to 180°. Your photo will at first be at 0°. Move the regulator until the value -90° is shown in the “angle” field. If you don’t hit exactly 90 with the regulator, you can either use your mouse to adjust this in the “angle” field or directly enter in the angle value. Click on rotate and repeat steps 3 through 5 until the player’s photo is displayed in the blue frame.
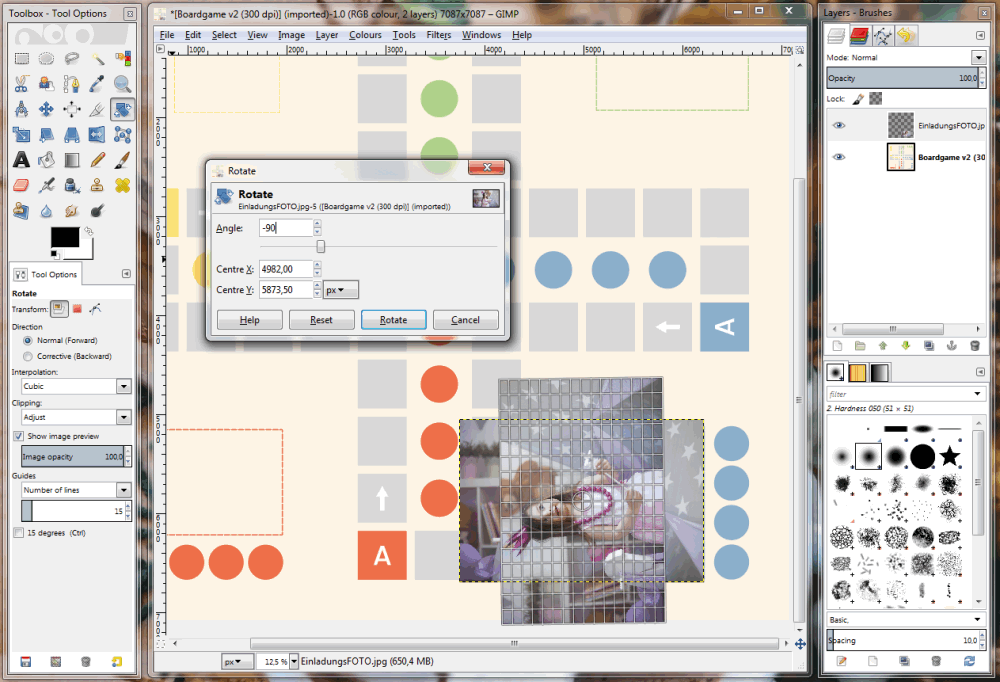
Step 7: Go through steps 2 through 6 again as described above for the last two player photos. For the yellow player you’ll need to rotate the photo 90° and for the green player you’ll need to rotate the photo 180°.
Step 8: Once you’ve placed all the player photos on the game board, save your image. It’s not advisable to save your file in between steps since you then won’t be able to undo any mistakes. Therefore, only save once you’re completely finished and pleased with the end result.
Step 9: You’ll need to save the image as a JPG file to be able to use your game board on the ifolor website. In GIMP, simply click on “File” and “Export as” in the drop-down menu. Input a name for your file and make sure that the file name has .jpg at the end. Then click on export.
Your completely individualised game board is finished. Have fun!

