Photoshop Tutorial: Turning Daytime Photos into Night time Photos
Editing images is a big part of photography. The goal is not always just to optimise your shot. Photo editing programmes such as Photoshop make it possible to give an image a whole new statement. One possibility is to transform shots taken during the day into dark and mystical night shots.
In this article, you'll learn step-by-step how to use Photoshop to not only give your shots a nocturnal mood, but also how to make any extinguished light sources glow.
Turning Day into Night on Photoshop
To turn a daytime shot into a night time shot, you will first need to open the RAW file of your shot in Photoshop. The RAW file contains a lot of image information, which makes detailed editing possible. If you did not take the photo in RAW, you can also use a JPEG file. However, there is a risk that the quality may not be as good after editing the image.
Various adjustment layers are needed to create the night effect. These can be opened on Photoshop by clicking on the black and white divided circle at the bottom underneath the layers toolbar.
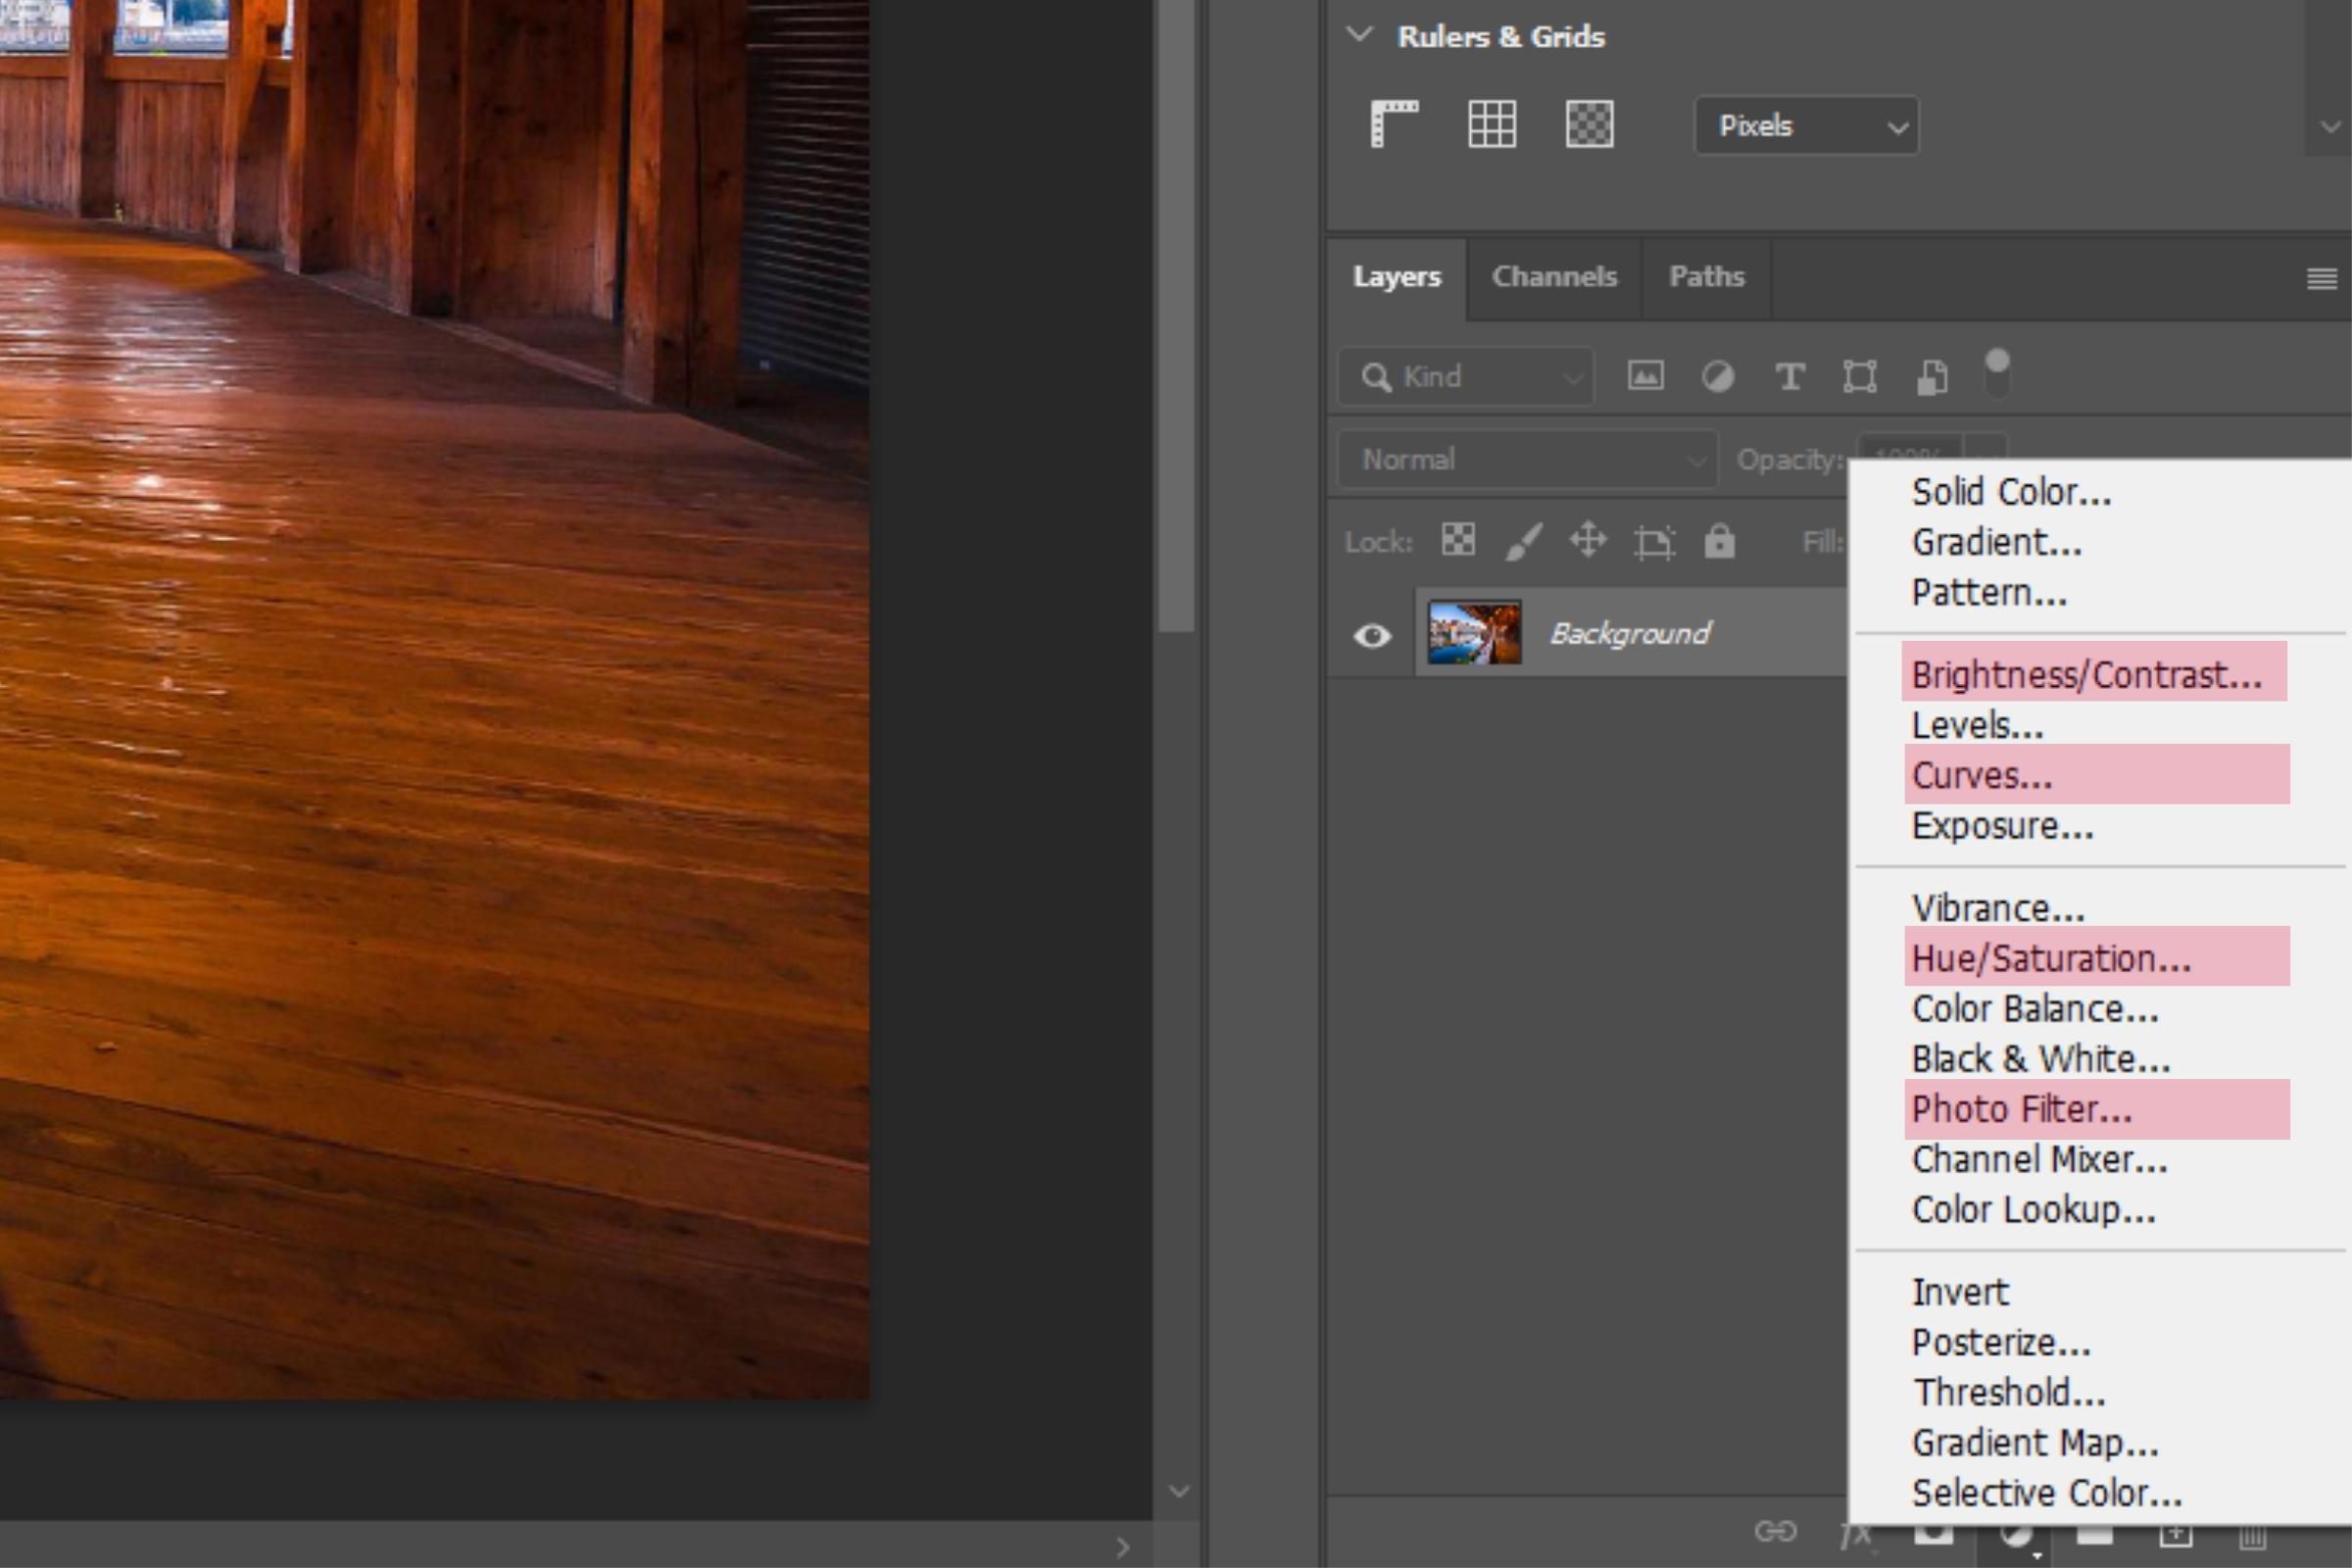
Start off by selecting "Brightness/Contrast". There are two bars, one for brightness and the other is for contrast. Reduce the contrast by moving the toggle on the bar all the way to the left to minus 50. The brightness of the image will remain unaffected for the time being.
The second adjustment layer controls the colour and saturation of your shot. Since both contrast and saturation are not very noticeable in night shots this is also lowered. How much the saturation is lowered depends on the image itself. If the photo is very colourful and rich in contrast, then the saturation will need to be lowered a lot. For photos that are less colourful, then a slight correction may be sufficient. Make sure to reduce the saturation until the colours are still faintly visible. In our example picture the saturation was set to a value of minus 70. Next open the adjustment layer ’’Gradation Curve" and set two points in the coordinate system below the straight line to obtain a curve that moves towards the x-axis.
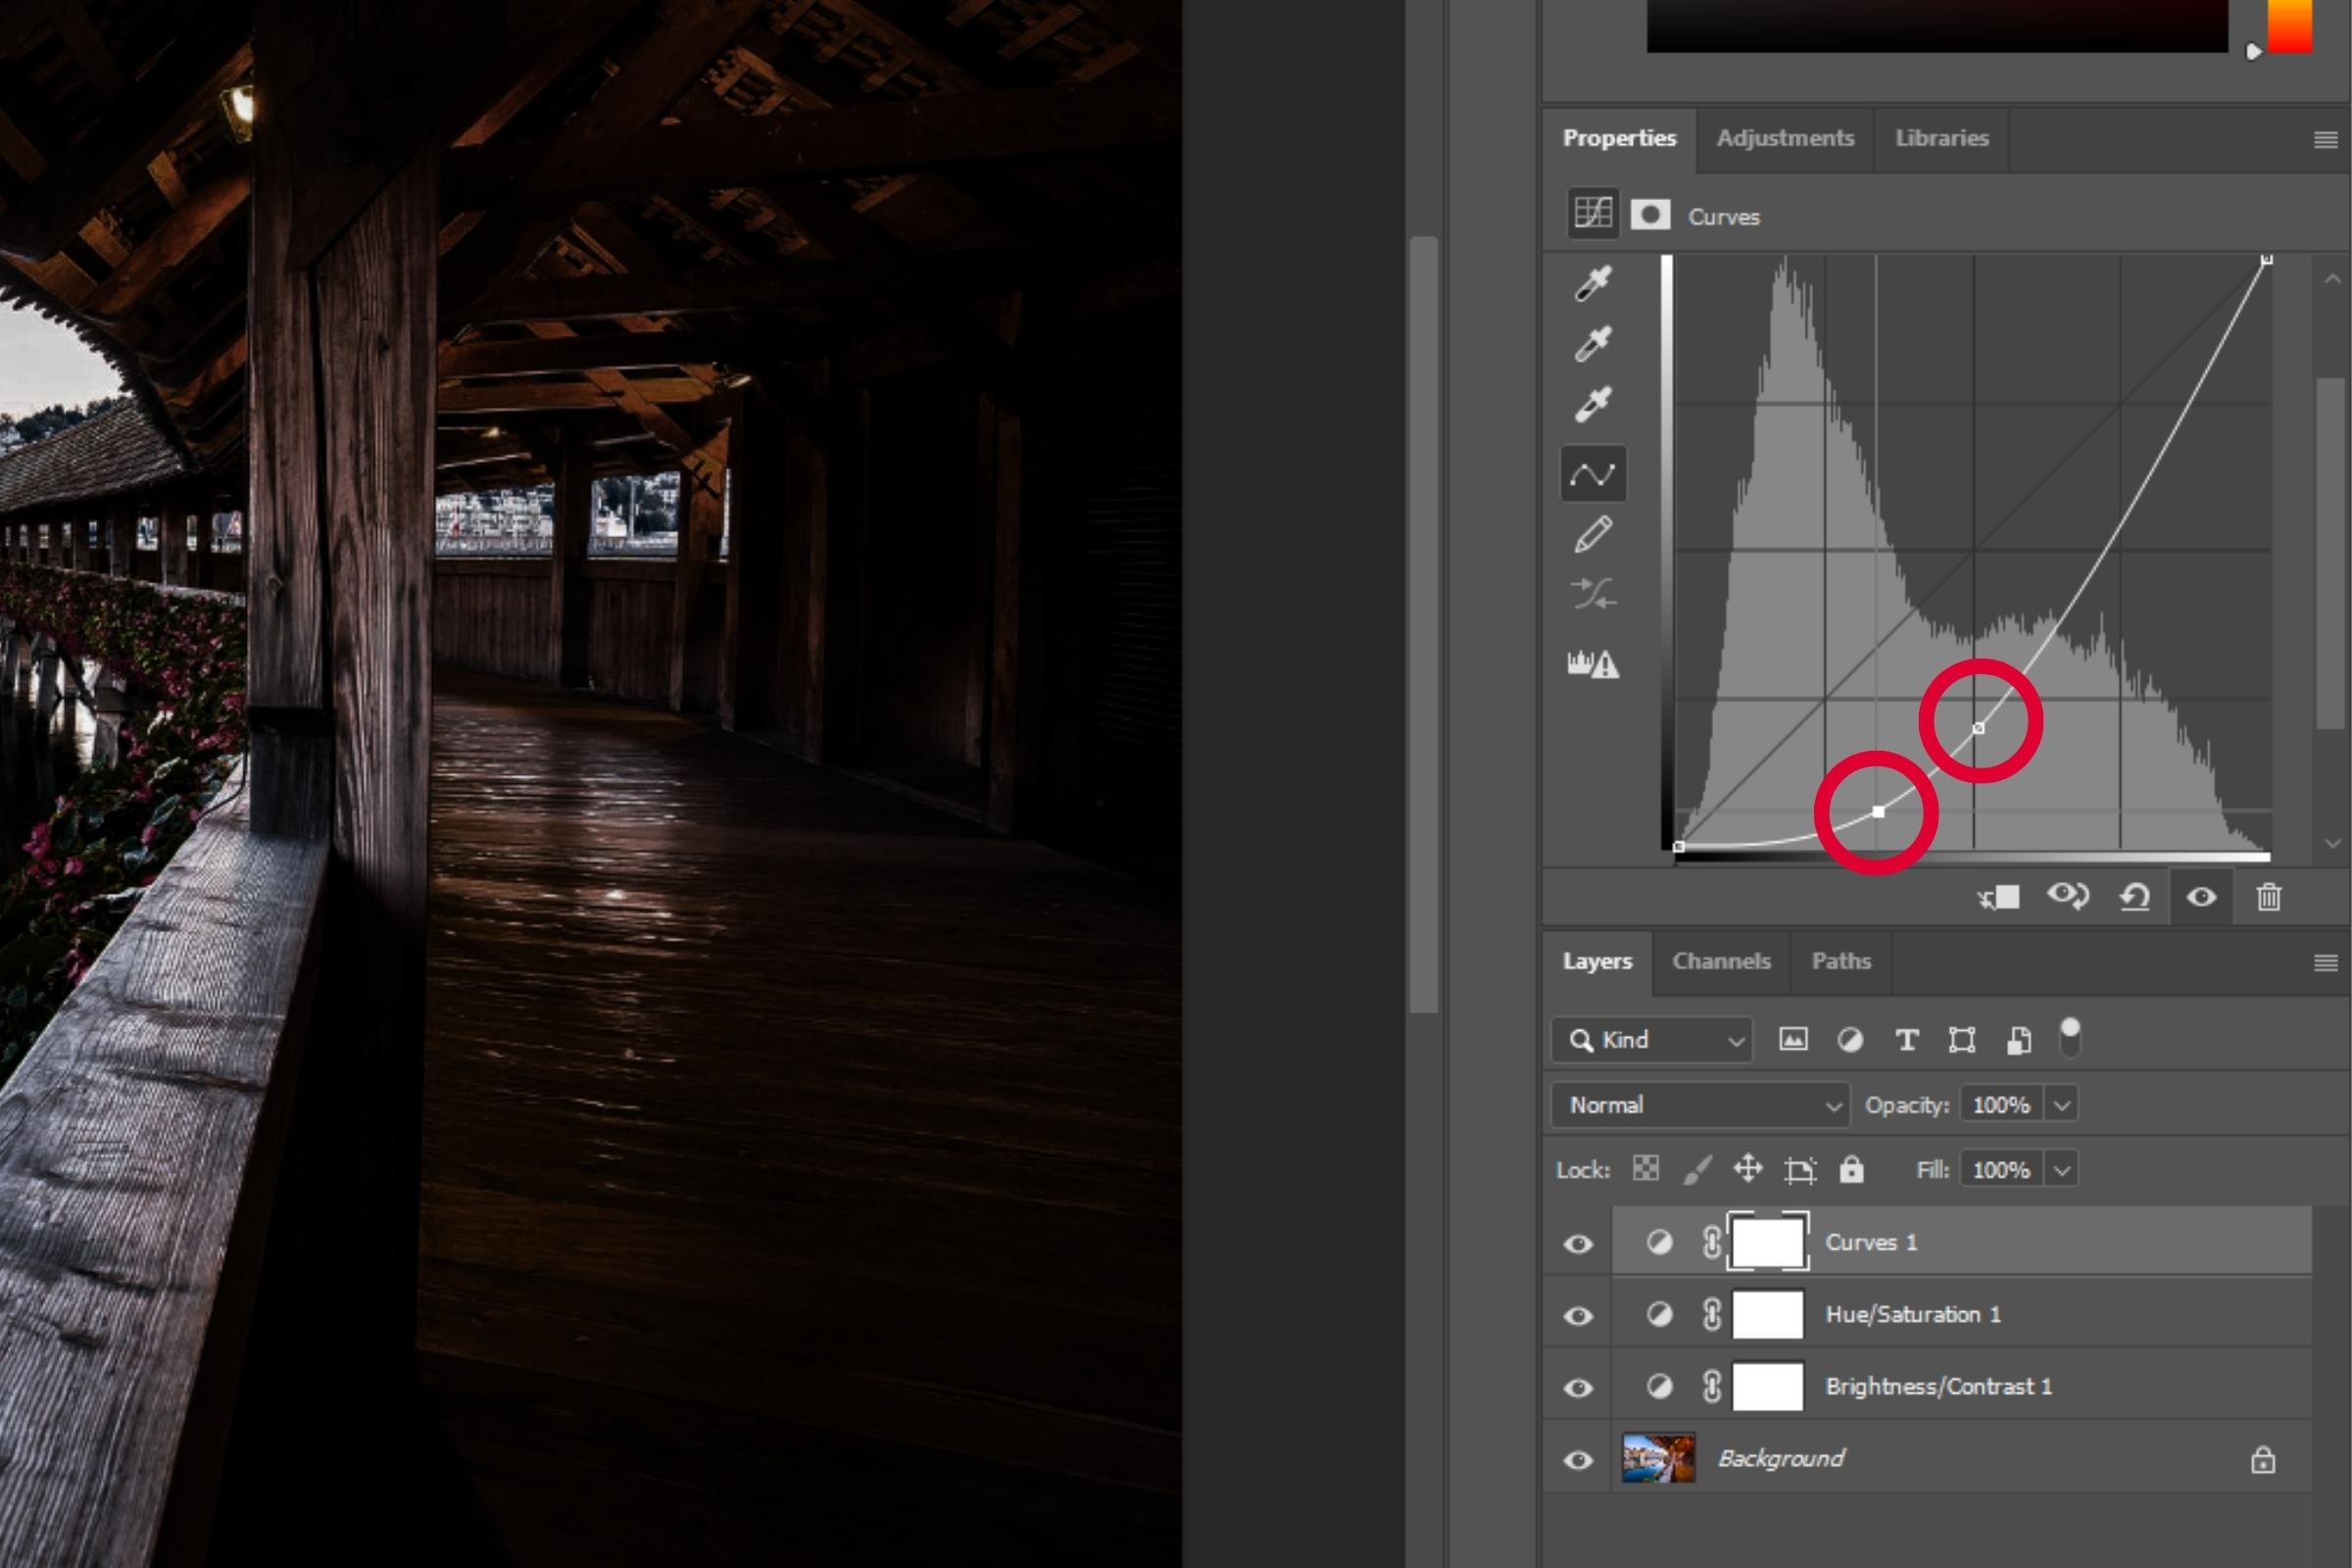
By changing the curve the brightness and again the contrast of the image will be changed. If you are not keen on the result, you can change the points set in the coordinates at any time. After the first three adjustments the shot has become considerably darker. However, it still doesn’t look like a photo that has been taken at night.
To give your image that typical night time look select "Photo filter" as the fourth and last adjustment layer in this editing step. On the settings remove the tick from "Preserve Luminance" and select the "Colour" feature. By clicking on the coloured square a new window appears in which a new colour can be selected. To get the perfect night time look you will need a darker blue. To intensify the effect you will need to increase the "Density" to 80 to 90 percent.
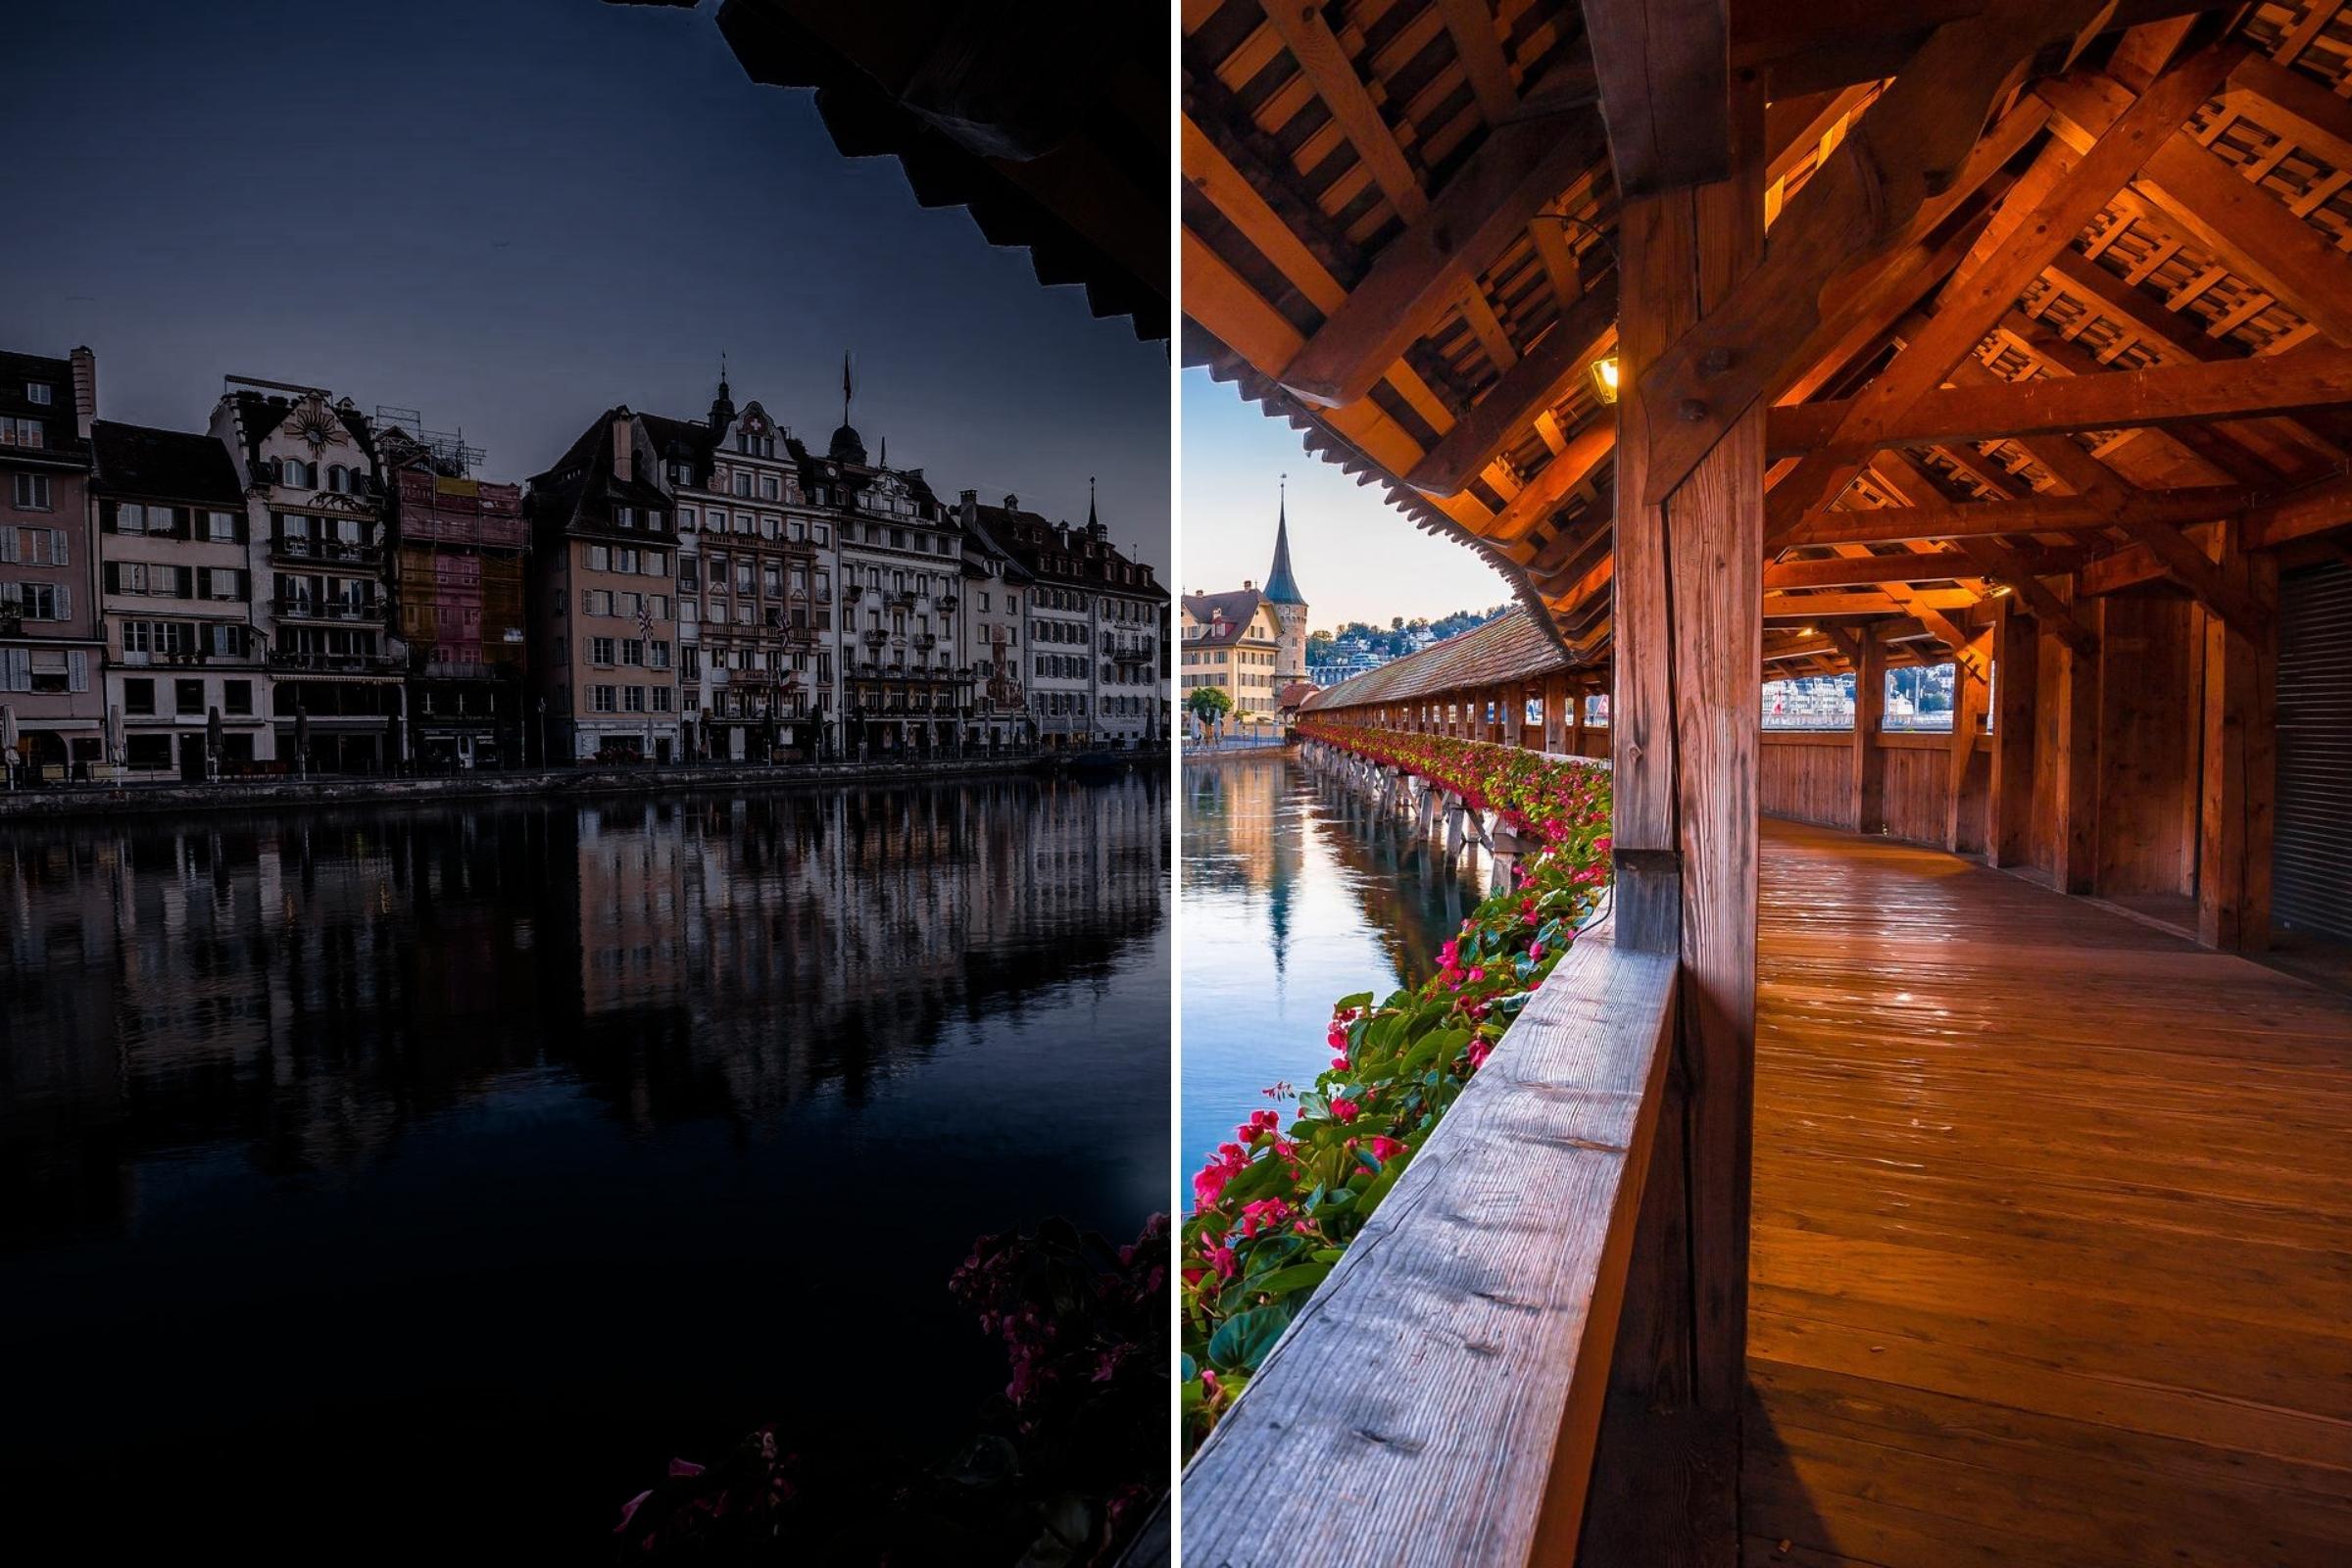
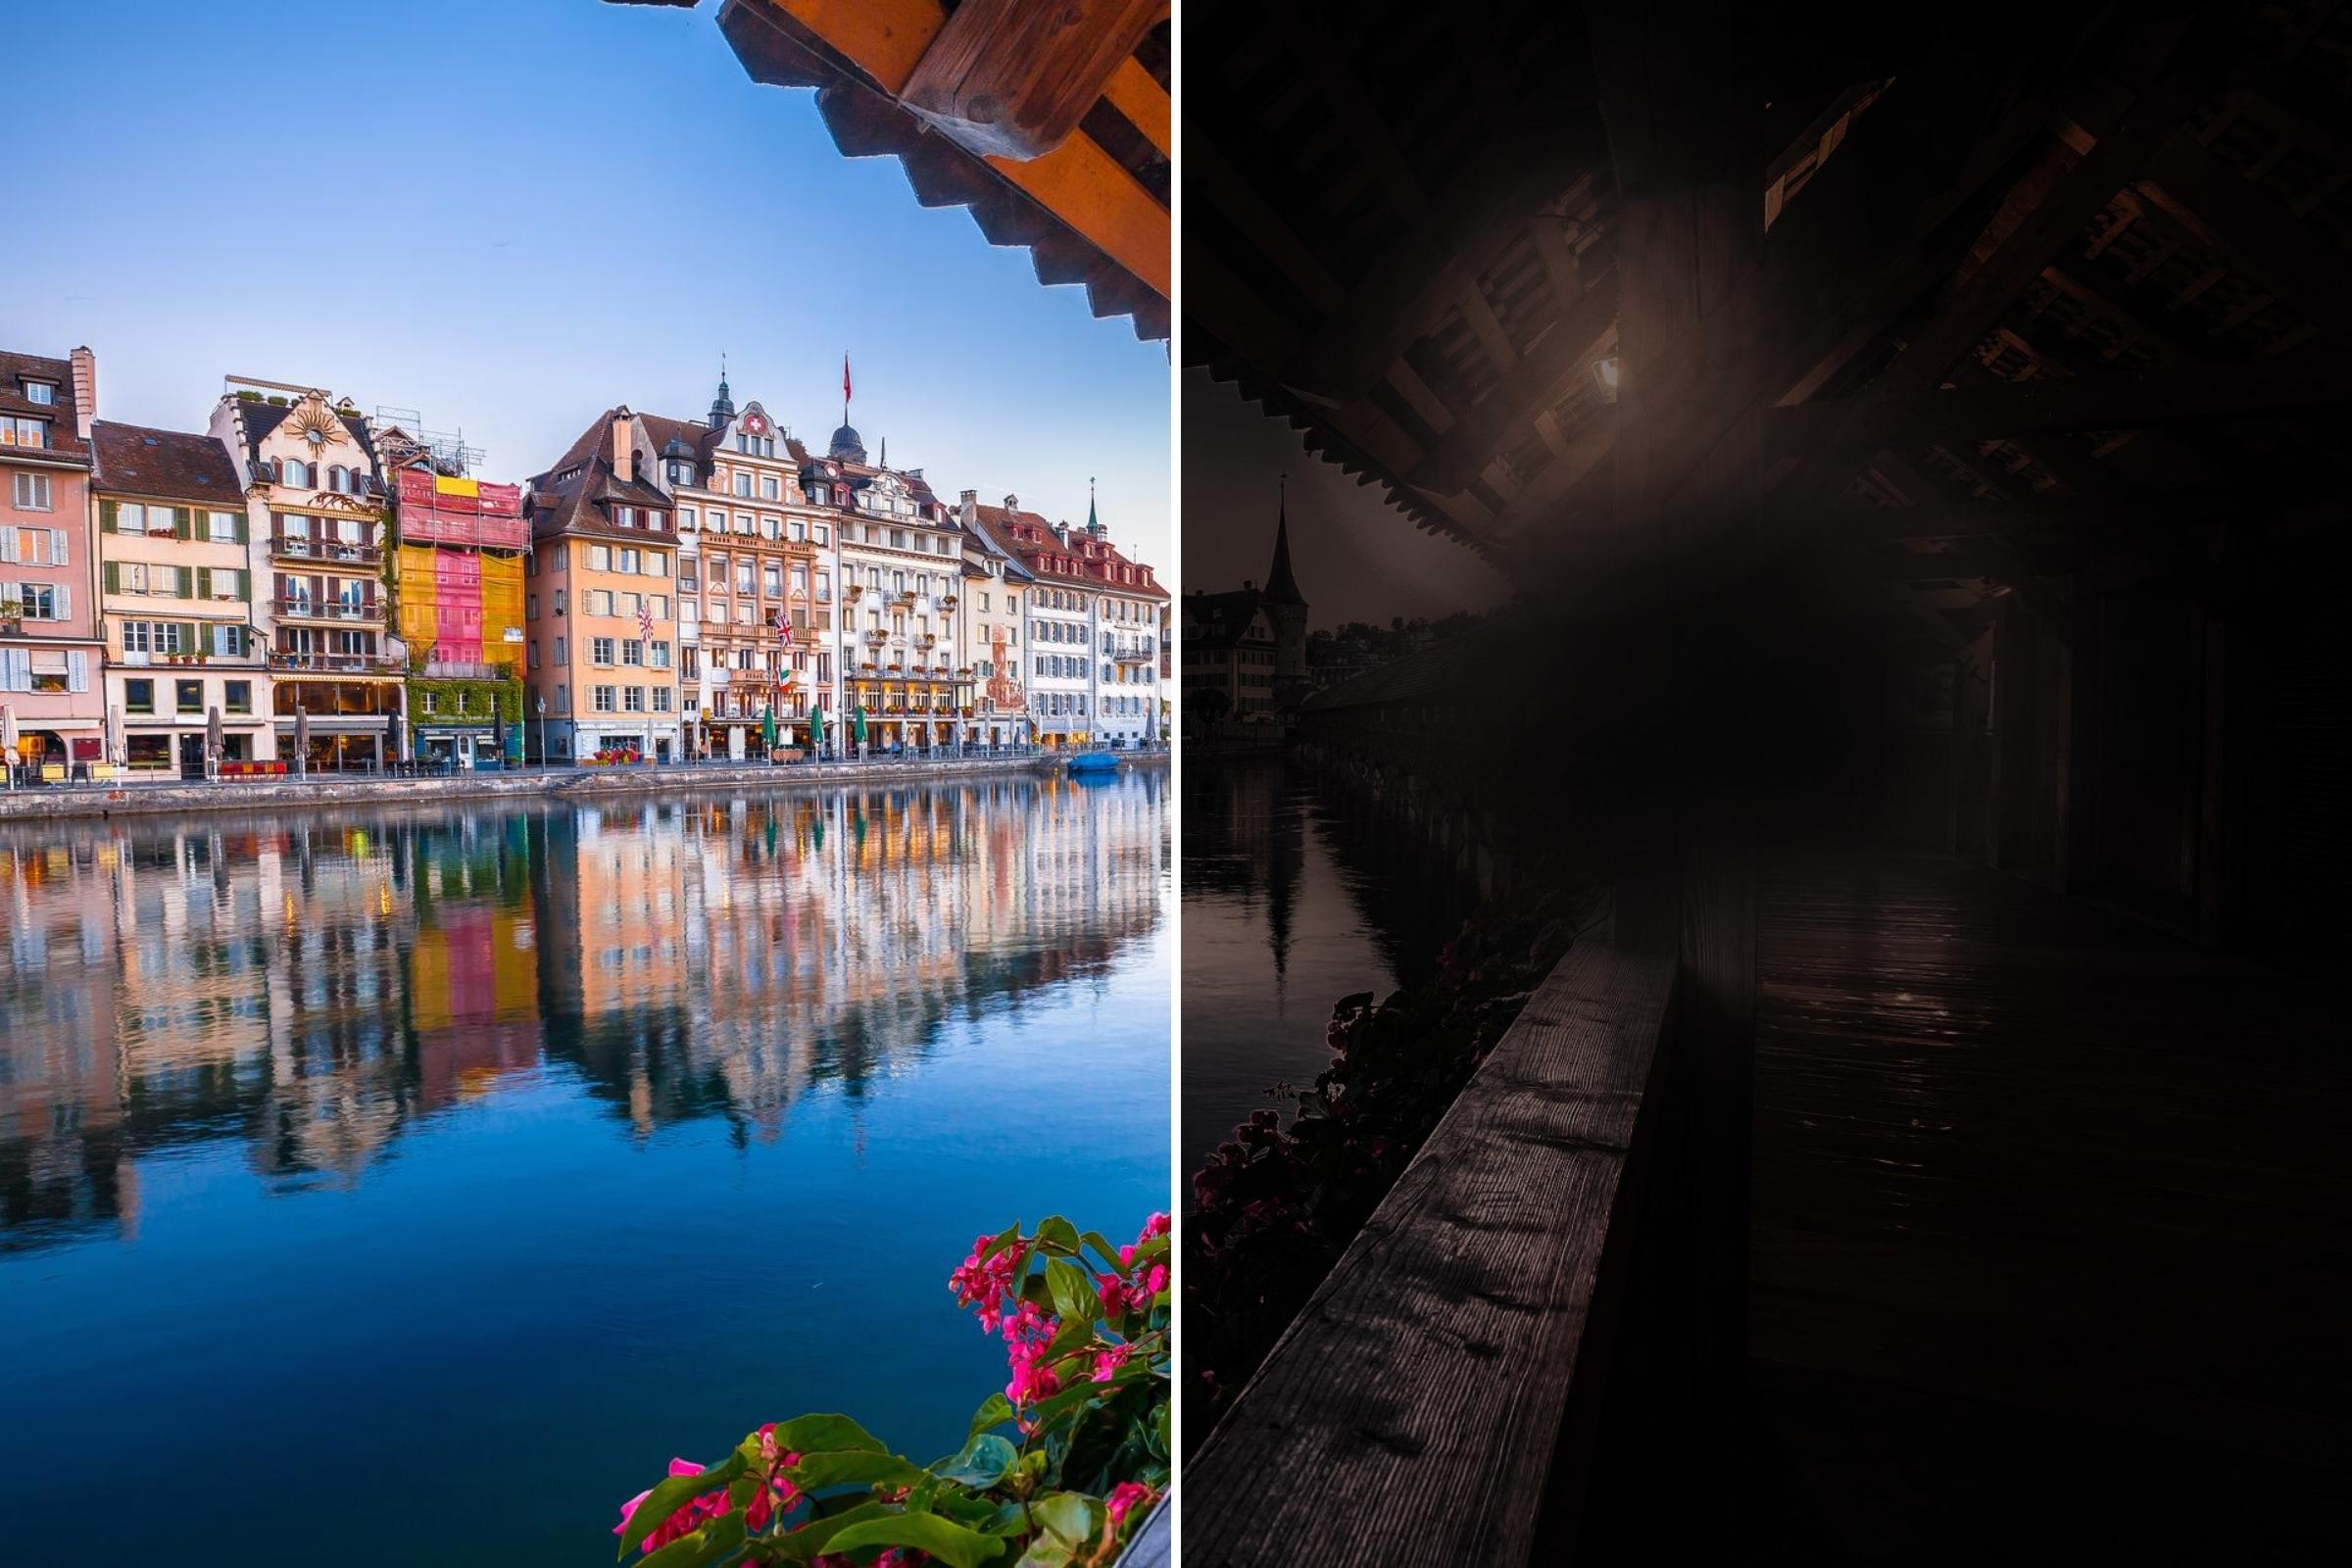
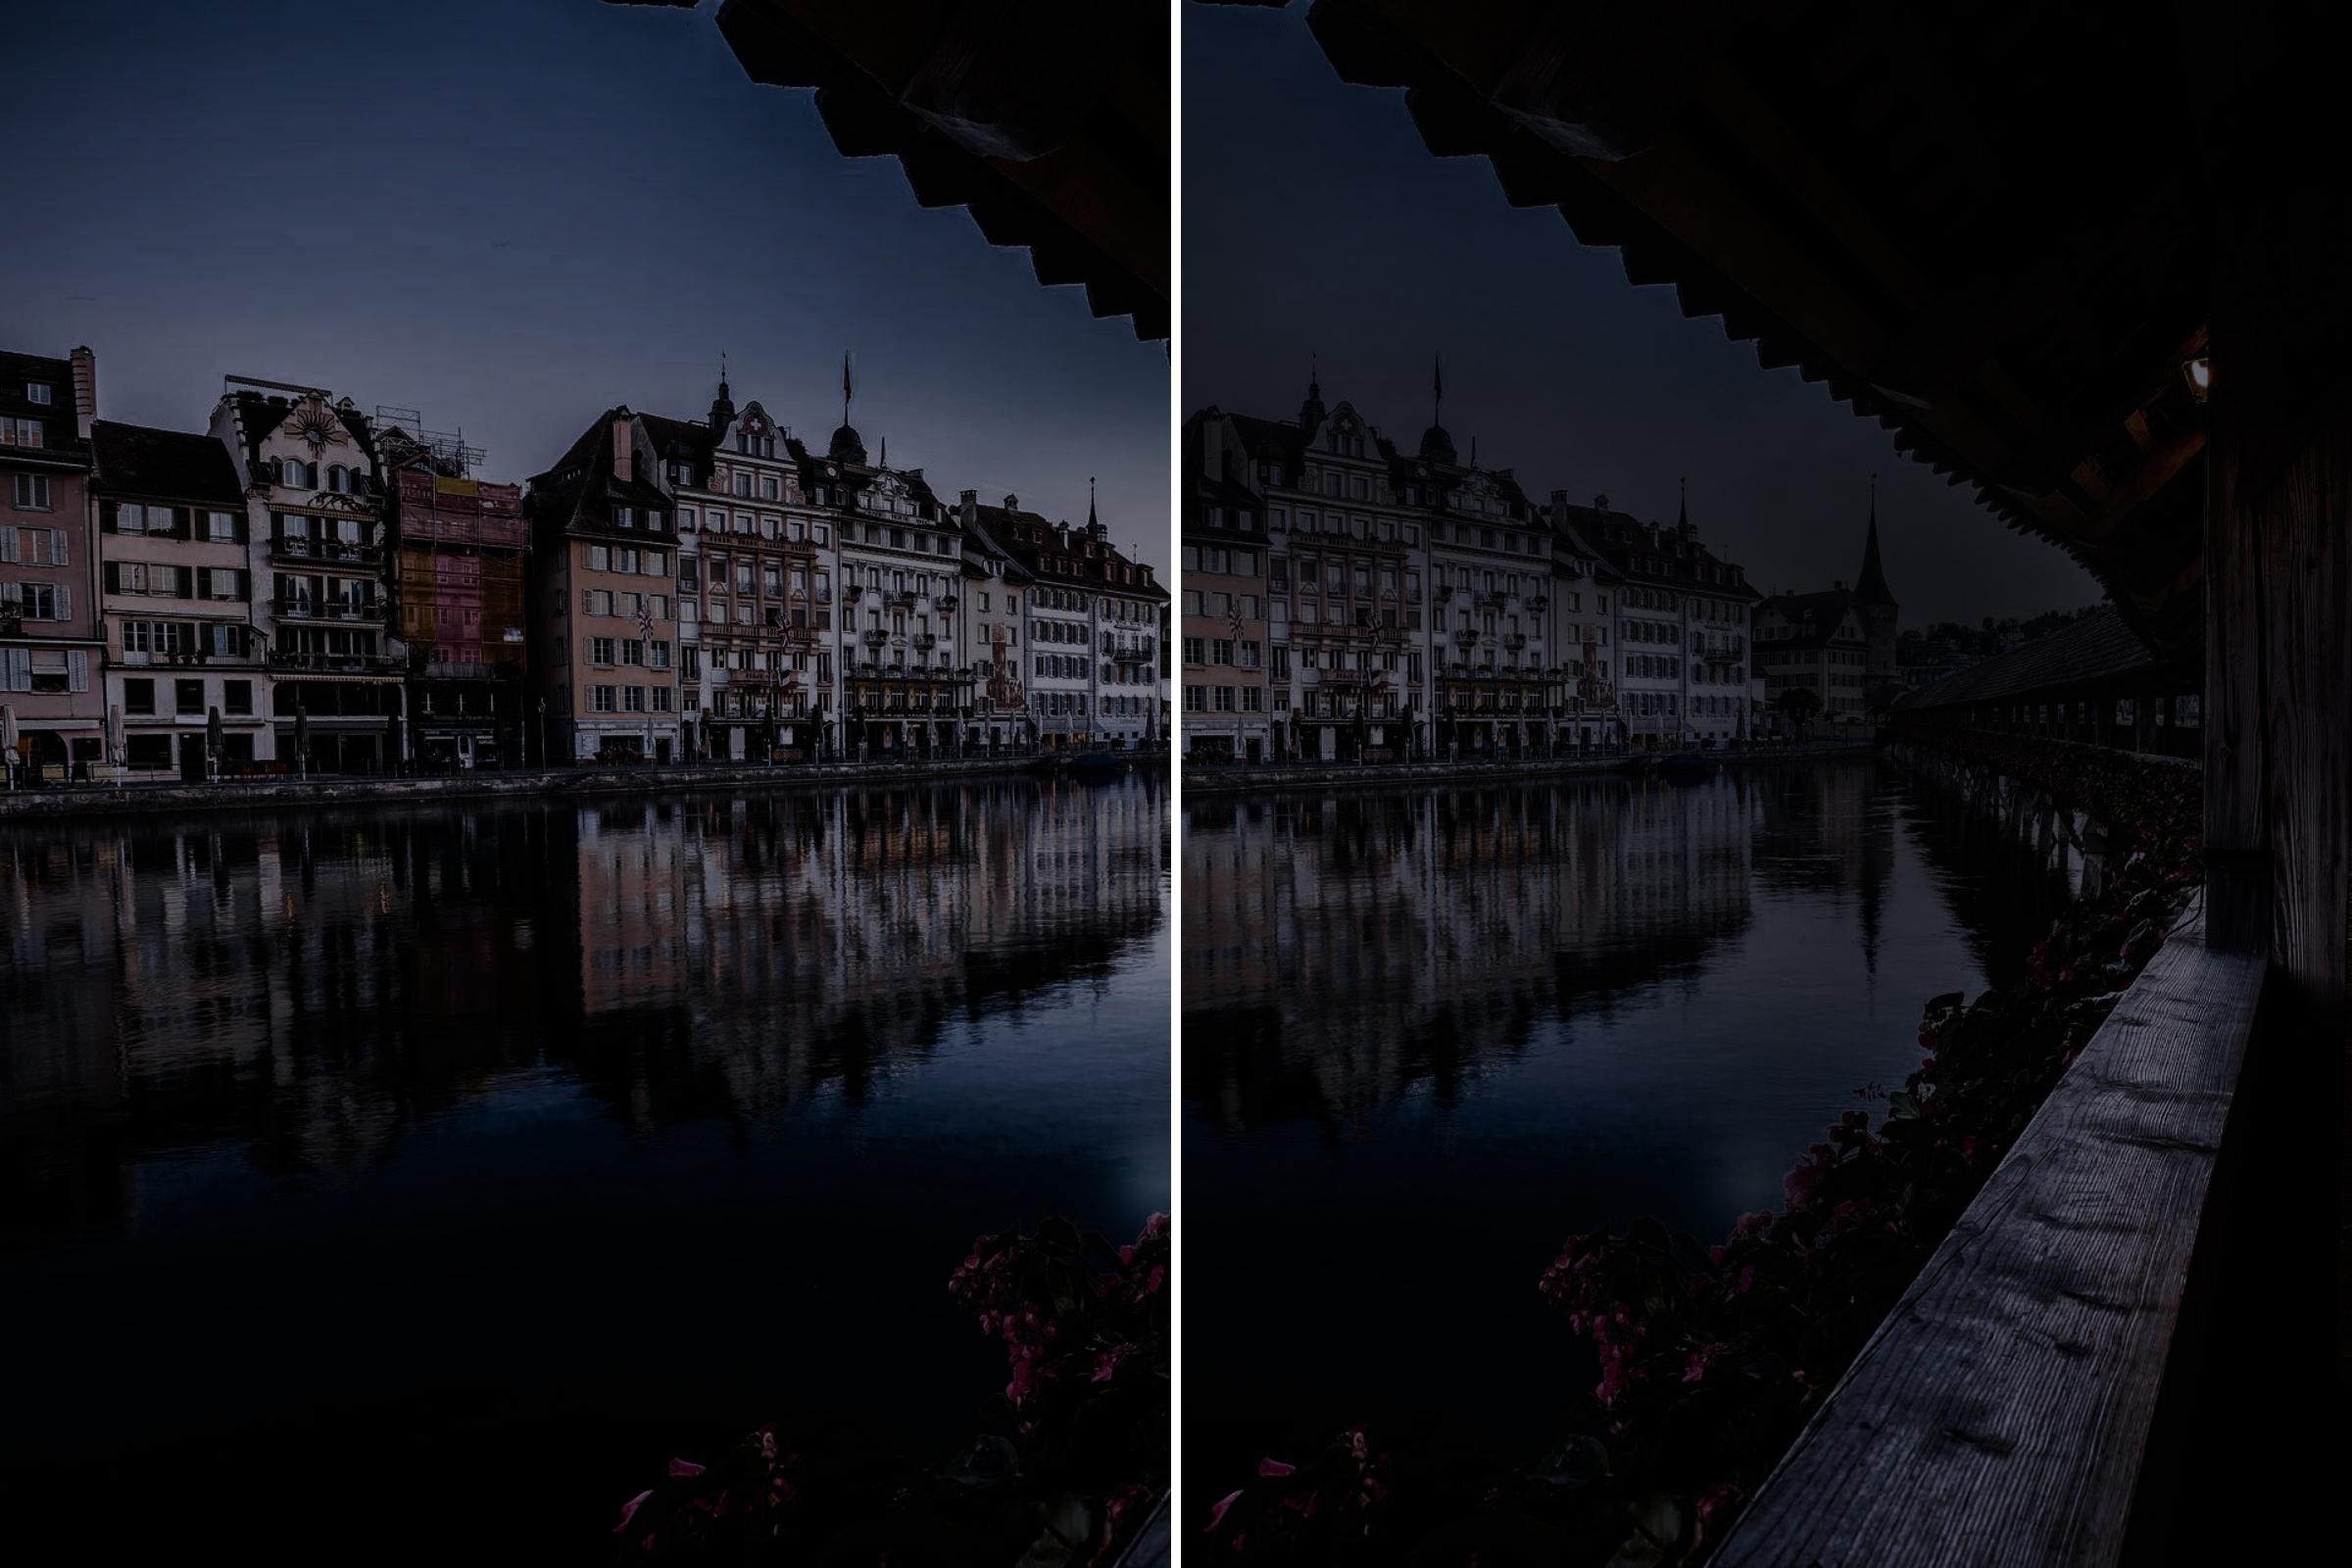
The photo on the left is a shot after the four adjustment layers and the photo on the right is the original shot.
The great advantage of adjustment layers is that they can be changed at any time. This makes it possible to change the contrast, brightness or even the saturation afterwards.
Tip
You can create groups in order to get a better overview of the Layers toolbar. Mark the four adjustment layers that were needed for a night time shot and put them into a group by using the following keyboard shortcut "Ctrl+G" for Windows or "Ctrl+G" for Mac. You can rename the group by double clicking on it.
How to Darken the Sky
In the example image above the sky and the river have many bright areas, which make them still look very bright even after darkening the image. This can be quickly remedied with the Eyedropper feature and a large, soft brush.
Capture the colour of the sky by using the Eyedropper tool. Make sure that the background layer is selected. You will need to select the brush tool once the blue tone of the sky has been captured. Use a fairly large brush that covers a large part of the sky so that you don’t have to do lots of small brush strokes. The opacity and flow of the brush should have a small value so that the effect remains natural. Now click on the brush over the desired areas. By clicking several times instead of holding and dragging the mouse the colour will be dabbed over the sky and the river. This creates a certain irregularity, which makes the effect look more natural.
This simple tip will help you to easily adjust the sky so that the image has a night time effect.
Comparison: the photo on the right has a darkened sky and the photo on the left doesn’t.
Making Streetlights Stand Out
Even at night various streetlights or neon signs shine in the streets and alleys. The next task is to make sure that they shine and really stand out.
Start off by duplicating the background layer and then add a layer mask. To do this, click on the mask symbol underneath the layers toolbar. Once you have created a layer mask it should be automatically selected. Next you will need to colour the layer mask with the following keyboard shortcut "Ctrl+I" for Windows or "Ctrl+I" for Mac. Colouring the layer mask black will make the copy of the background invisible.
Leave the highlighted area on the layer mask and choose a soft brush and the colour white. Choose an opacity of 70 percent and a flow of 10 percent. The white brush allows you to make the different areas of your original photo visible again. The original colours of the photo are needed in places where streetlights or lanterns shine and thus illuminate the walls of a building and other objects.
Using the brush carefully go around all the light sources in the photo. Certain areas will become brighter the more you go over them with the brush. Make sure to follow the outlines of the objects so that it appears more natural and in just a few clicks you will be able give your photo a fantastic night effect. If you have made your original photo too light, you can easily correct this by using a black brush.
An adjustment layer "Photo filter" will now be added again. By clicking on the clipping mask you can make sure that the adjustment layer only applies to the underlying layer and not to the background layer.
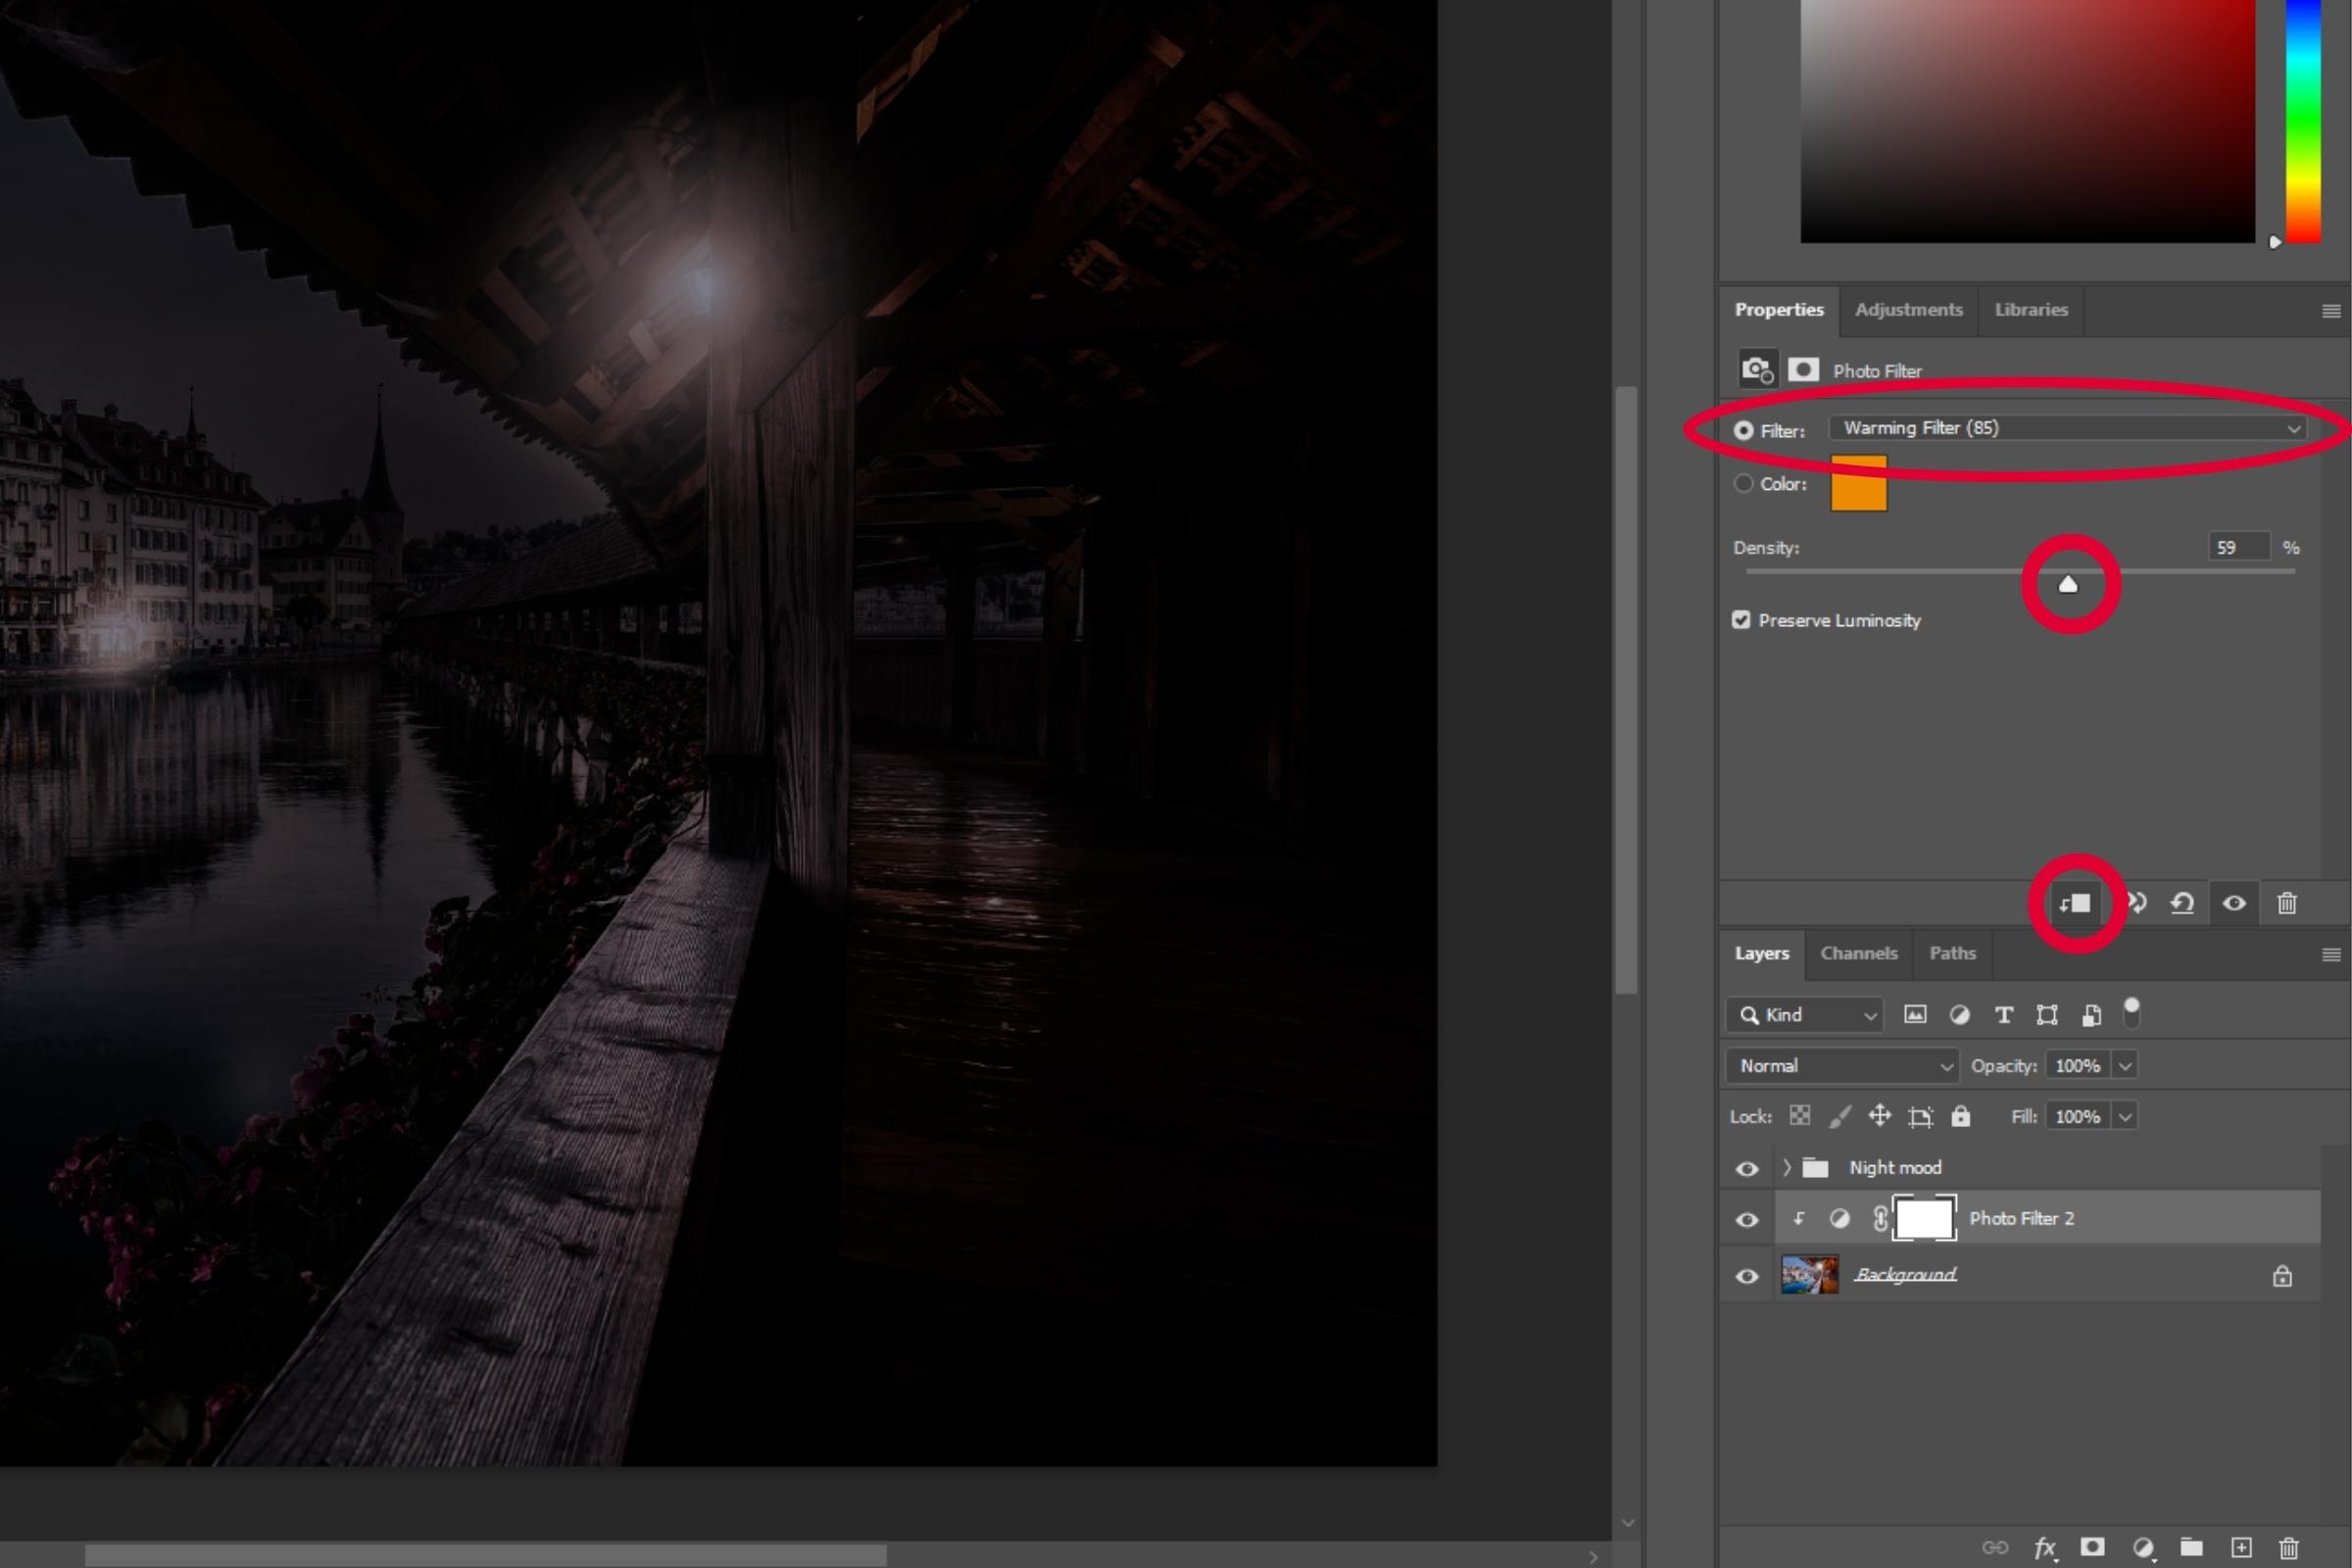
This time click on the "Preserve luminance" box and select "Warm filter" as streetlights usually have a warm light. Next set the density to 50 to 60 percent. For lights in other colours you can use the "Colour" feature where you can choose the colour.
By following the previous steps you can make walls appear lighter, but any lights will not yet appear lit. To make the lights in your photo stand out, you will need to select the surface of the light source. The best way to do this is to use the Polygon Lasso tool and then start by selecting the light source. Then switch to the Select and Mask mode in order to easily select and include other surfaces. When you have finished highlighting all the areas you can close this mode by clicking on "Ok".
Firstly, to create a new layer select the background again and then insert the selected elements using the following keyboard shortcut "Ctrl+J" on Windows or "Ctrl+J" on Mac. Drag the new layer to the end, which brings back the original colour of your original image.
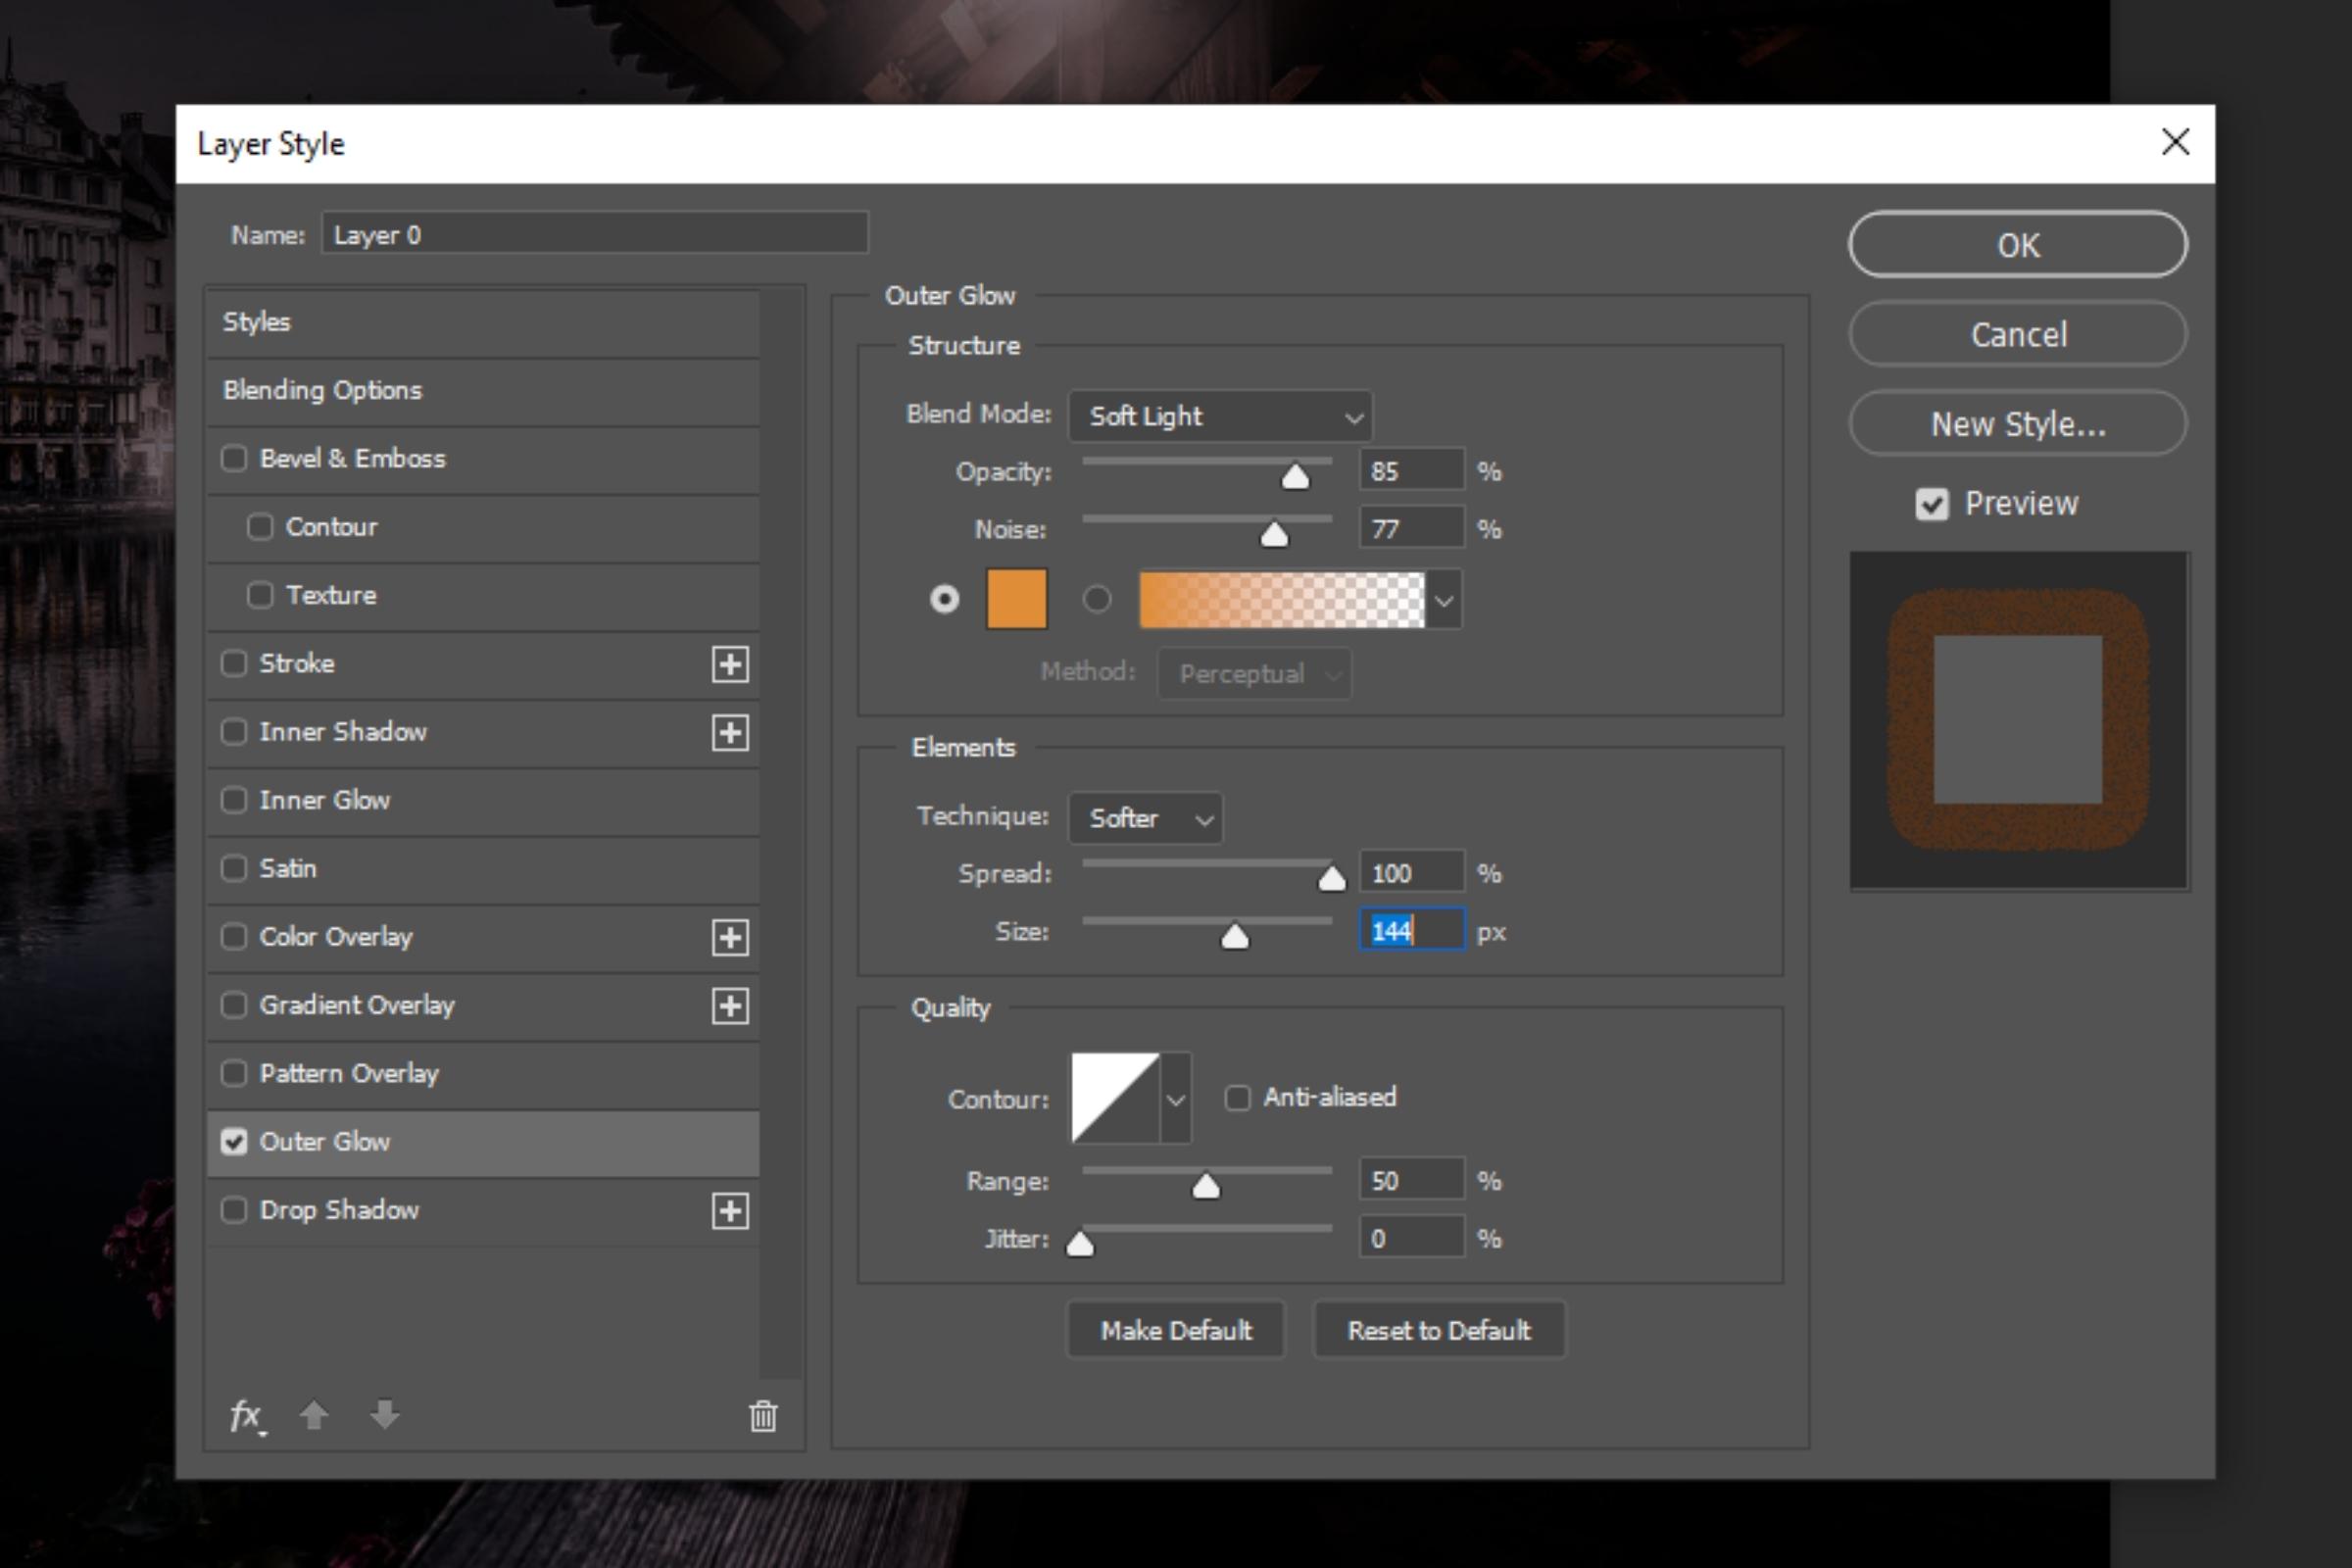
Start off by double clicking on a new layer and Layer Style will then appear as an external window. Next select "Outer Glow". The setting "Fill" should be set to soft light. In addition, the opacity and noise should be increased. For the colour, you will need to select a colour that matches the illuminated areas on the walls. In addition, vary the ‘’Trap’’ and ‘’Size’’ settings.
Once your light source appears as lit you will need to adjust the colour of the light. To do this, use a "Photo Filter" adjustment layer again to select an orange tone.
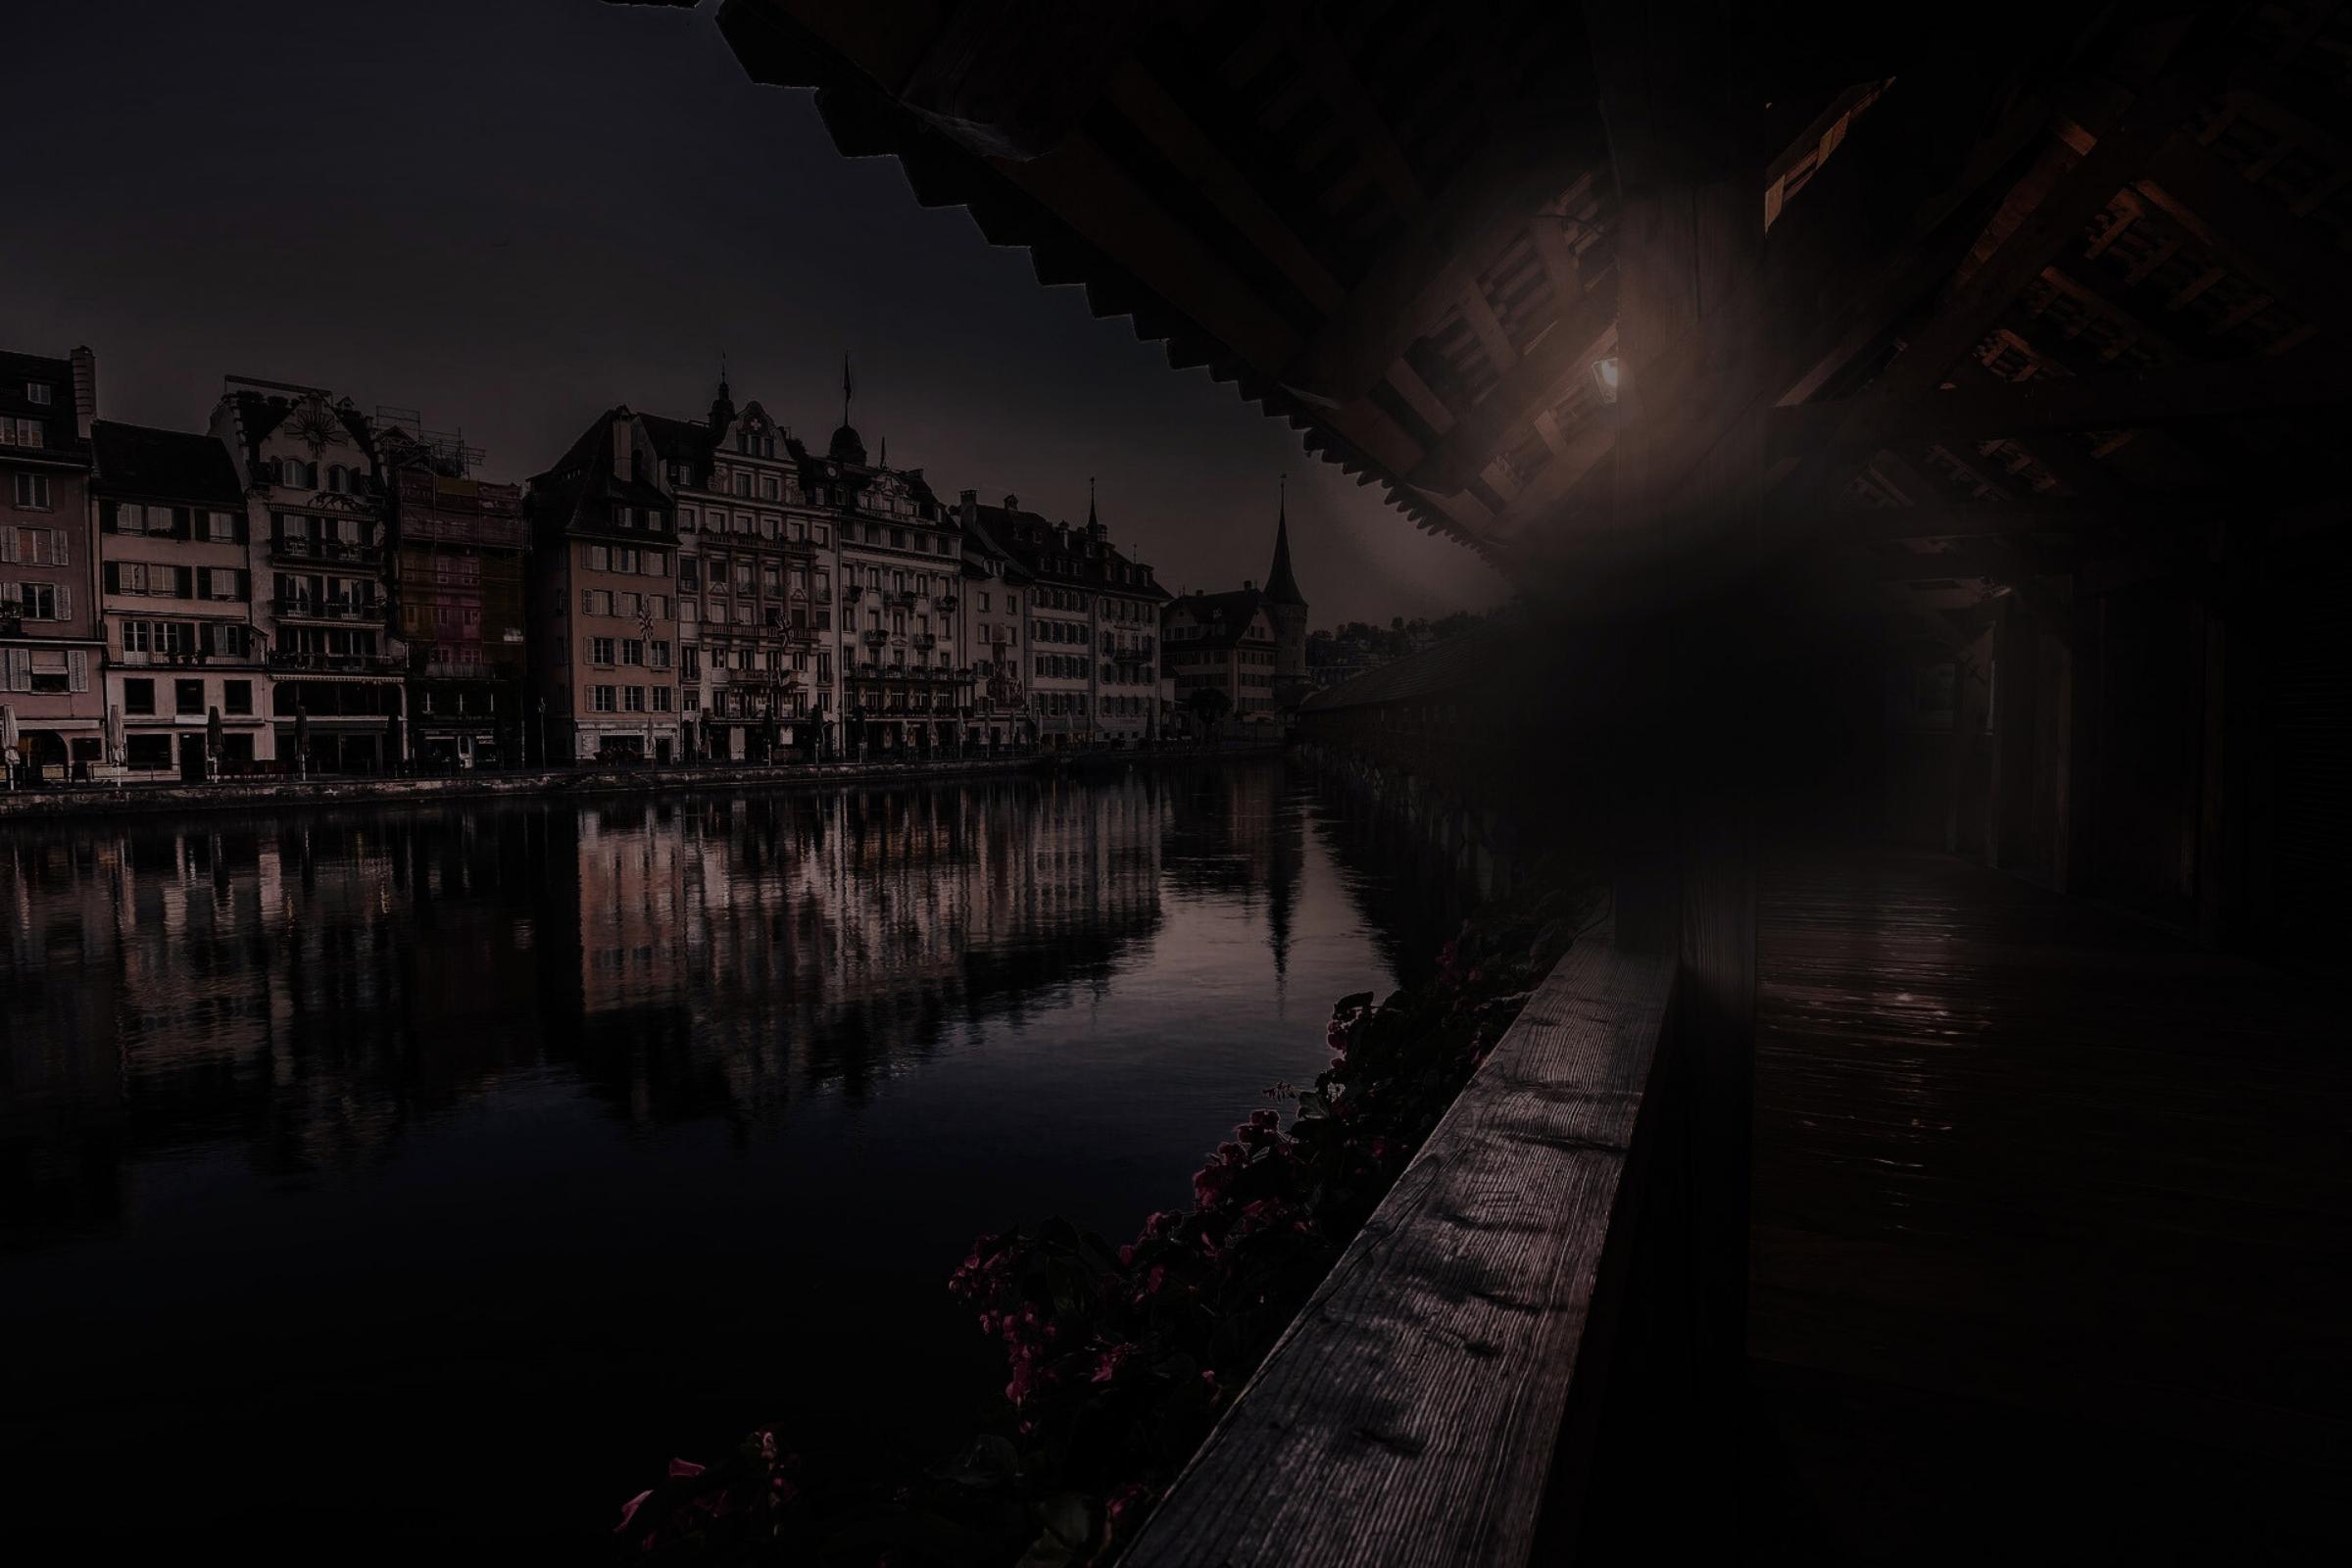
Once you have completed this last step your night time shot will be finished. The original image is hardly recognisable and the details of the image have all but disappeared due to the darkness.
We hope you have fun getting creative!